This is a translation of the Korean article. Original application screens, image labels and demonstration audio are retained in their original languages.

UPMI LabSmart Home · Home Automation
Agent AI × Everyday Life

A smart switch can do more than turn lights on and off.

I installed a 6-gang smart switch in place of the existing 4-gang mechanical switch.
The button display shows names, and the actions reflect our home's lifestyle.

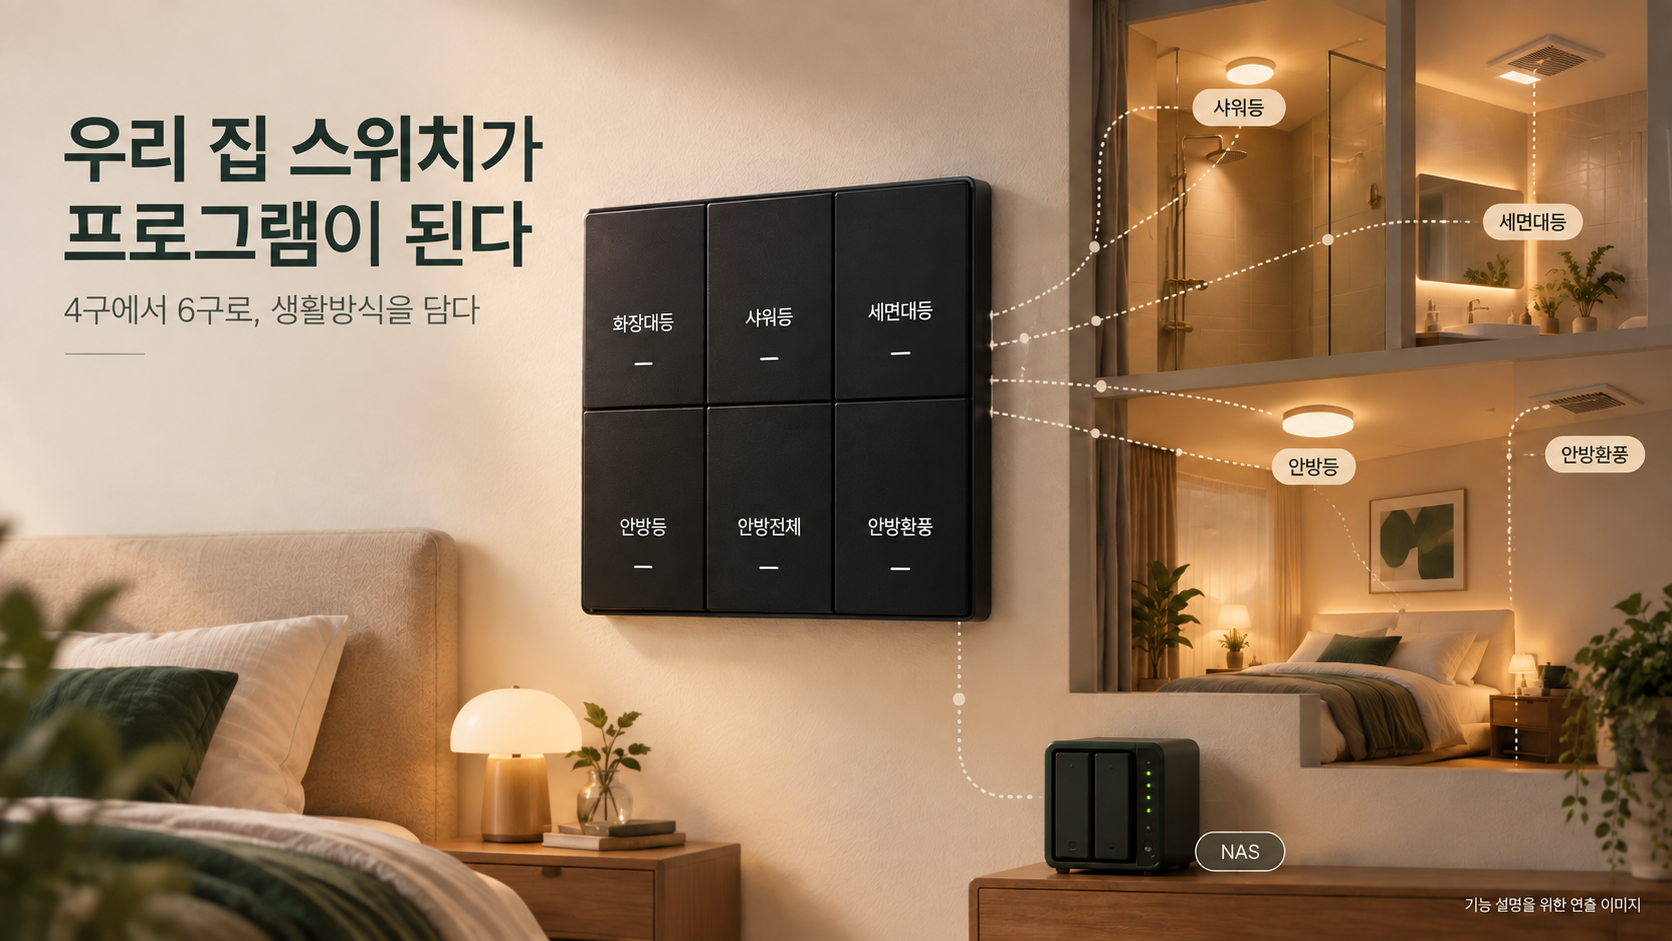
A generative image expressing the connection between a 6-gang switch displaying Korean names and lights/exhaust/NAS
This is a generative image expressing the idea of embedding our home's lifestyle into the switches. Actual before-and-after photos can be seen in '4-gang to 6-gang' below.
The starting point

I hope the switches also move in sync with our daily lives.
When leaving the room, I check each light one by one, and in the bathroom, I press the lights and exhaust fan separately. Even if I want to turn off the lights from the opposite end of the hallway, I have to go back to where the switch is. It's something I've just gotten used to doing, but there was no reason it had to be done this way.

When installing the smart switch, what I wanted was to reduce such inconveniences. I wanted things we usually use together to move together, separate the timing for turning off things that are turned off at different times, and make sure the current state is displayed correctly no matter which button is operated.

"When I turn on the vanity light, also turn on the exhaust fan.

When I turn off the light, keep the exhaust running for 15 more minutes.
Let me be able to turn off the hallway lights from both sides."
I explained these requirements to the agent and translated them into actual button and home equipment operations. Similar to program switches in large intelligent buildings,

I made it so that the role of a single button can be configured via software and linked to the operations of multiple devices.I connected the existing wall panel with lights, the newly installed smart switch, and the Apple Home app. Instead of replacing all home equipment with new products, I recombined the roles of already existing devices.

4-gang → 6-gang

Program Function for Additional ButtonsAt Once
Batch Control Reflecting Current State15 minutes
Vanity Light Off, Exhaust Fan Keep-On SettingFrom Both Sides
Synchronize Hallway Lights and Indicator Lights TogetherSynchronize hallway lighting and indicator lights
01 / One button, one room

Smart total lighting off
Operation method

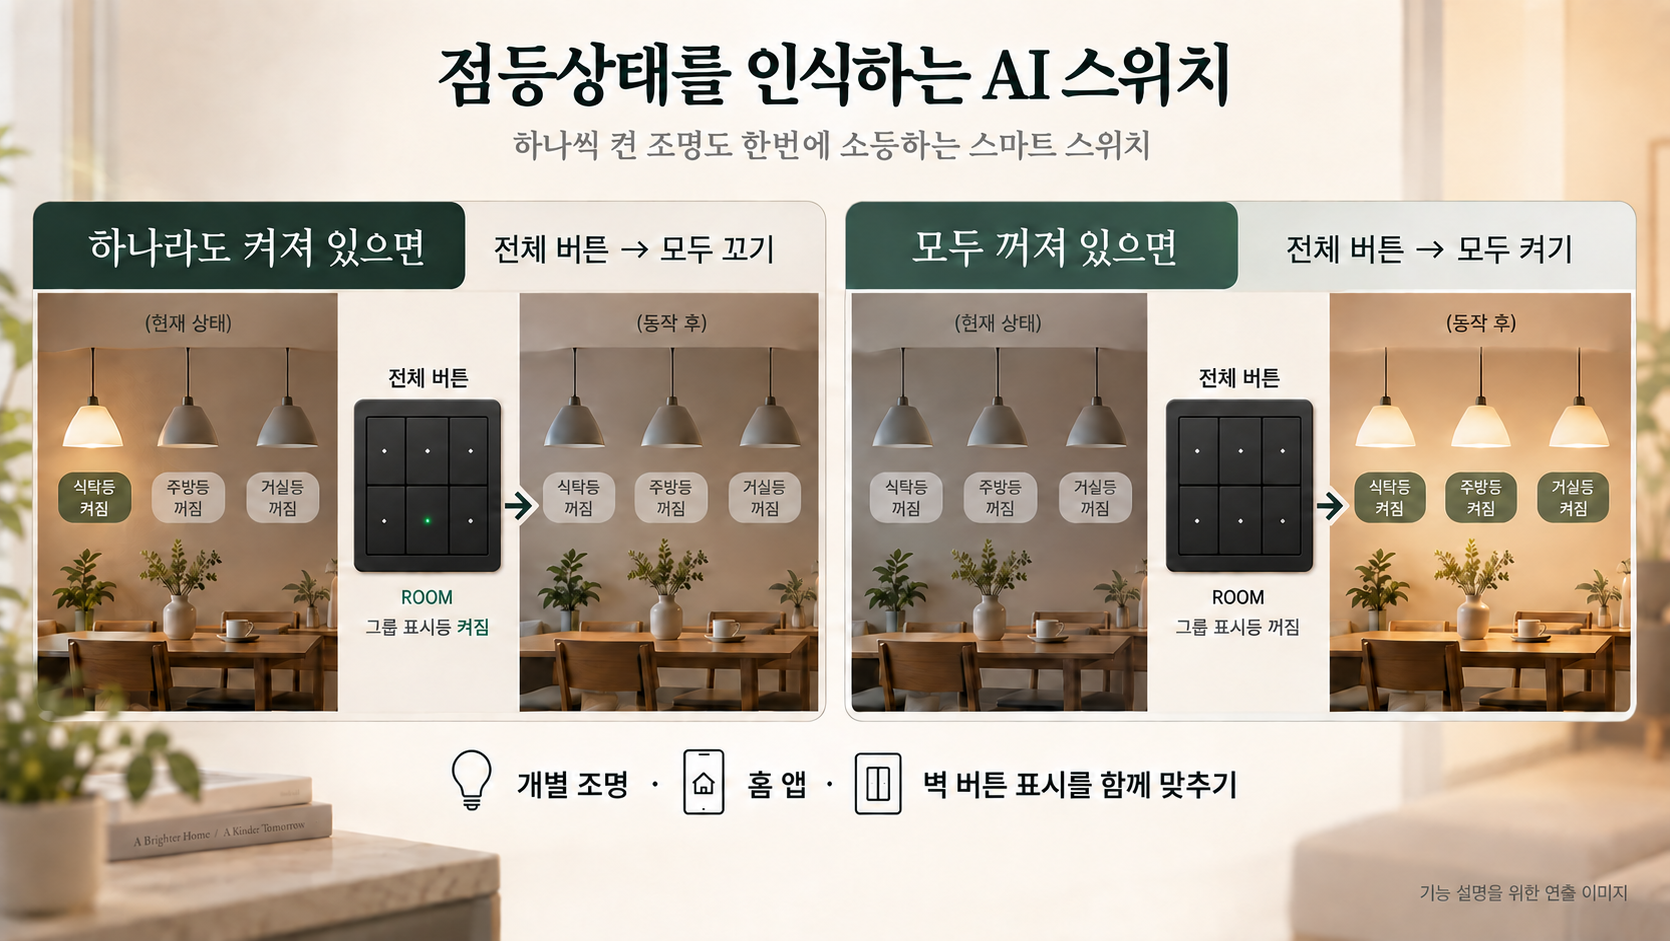
Two actions: turning off all lights with a batch button if any light is on, and turning them all on if they are all off
The range controlled by the batch button is a pre-specified group of rooms. It does not refer to all devices in the entire house.

01 · Individual lighting on followed by total lighting off

When individual lights are turned on, the total lighting off button becomes active. Pressing this button turns off all the lit lights at once.

19 seconds · 3.8MB · Includes ambient sound

Open video separately

02 · Total lighting on/off

With a single total button, you can turn the lights grouped together on and off simultaneously.

21 seconds · 4.5MB · Includes ambient sound

Open video separately

The 'Total Off' button seems easy to create. However, lights can be turned on via individual buttons and also via the Home app. If the batch button only remembers its own state, the actual lit lights and the button display will differ. This can cause situations where pressing it once results in unexpected behavior or requires two presses.

Therefore, we changed the batch button tocollectively assess the status of devices within the groupThis way, if any device is turned on regardless of the path, the batch display also turns on. When the last device is turned off, the display turns off as well.

If at least one device in the group is onOne button press → Turn all off

⇄

If all devices in the group are offOne button press → Turn all on

In the living room, I grouped the kitchen, dining table, living room, and hallway lights together. In the master bedroom, I grouped the lighting with the exhaust fan. I decided which devices to include based on how I actually use them. Here, 'customized' does not mean that AI automatically learned my habits,but rather that I programmed the life rules I wanted.

Action preview · Not connected to an actual home

After changing individual lights, try pressing the bulk button.

Some lights are on. Pressing the bulk button will turn them all off.

The blue indicator light shows how it will operate if you press it now.

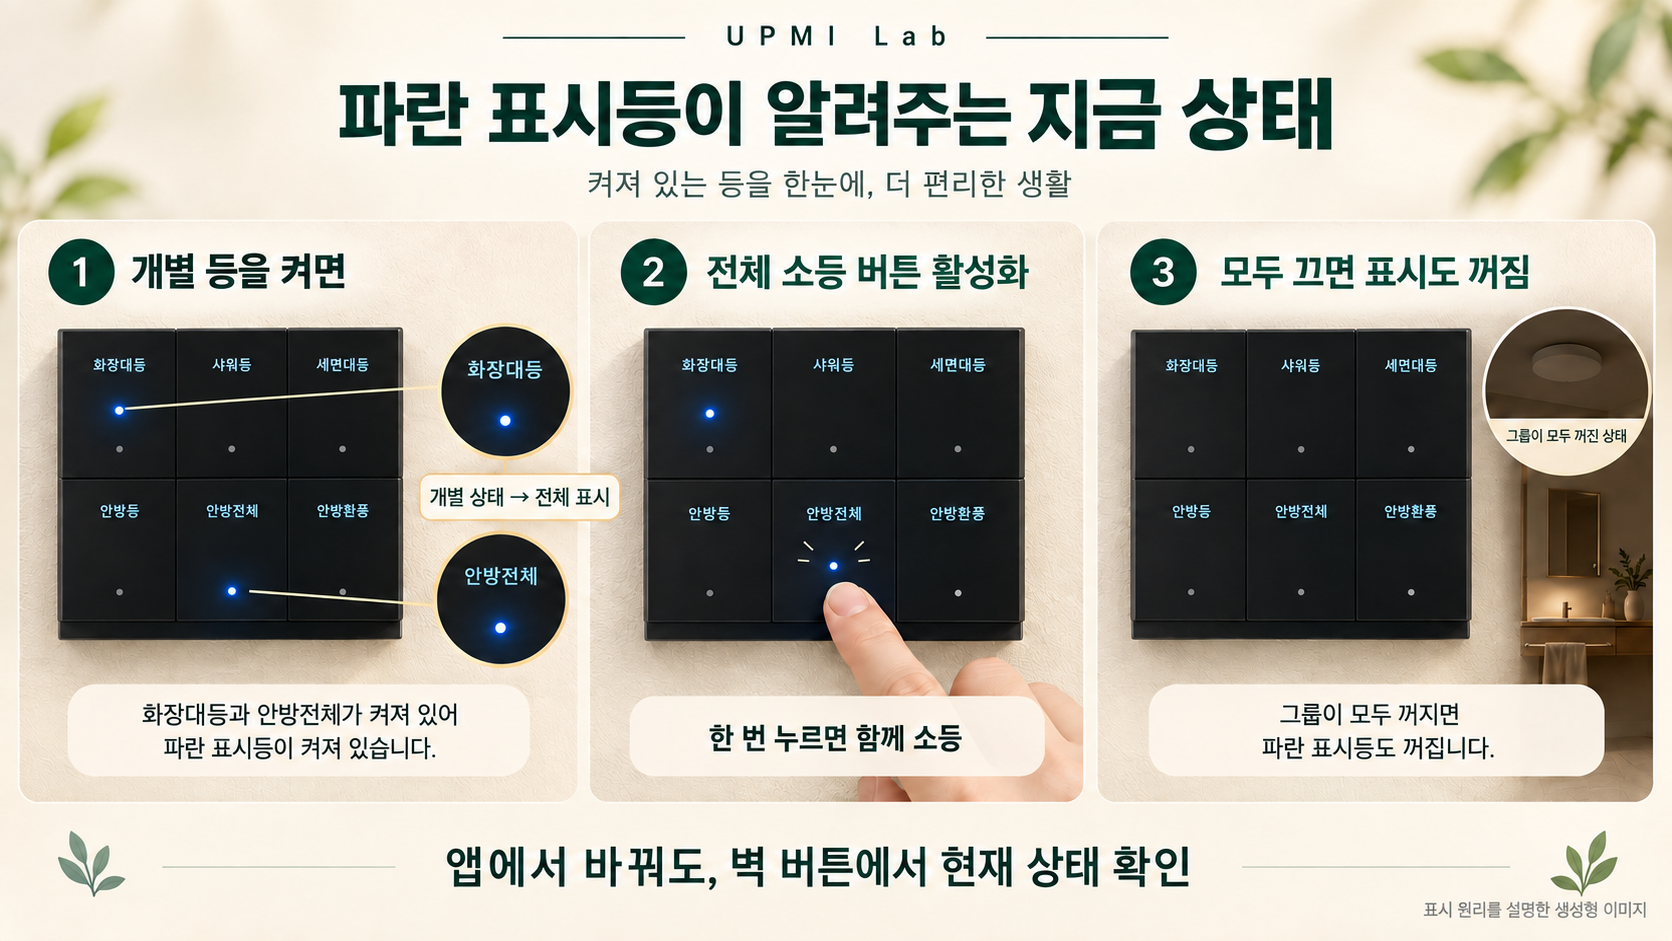
If the lights are on but the wall button appears off, you might wonder if you need to press it again. Therefore, I made it so that when individual lights are turned on, the overall dimming button's indicator also activates. When all devices are turned off, the overall indicator also turns off, and next time it will operate as an overall lighting function. I adjusted it so that states changed in the Home app are reflected on the wall buttons, ensuring you see the same state regardless of which side you operate from.

An image explaining the process where the blue indicator light of the total shutdown button activates as individual lights turn on, and turns off when all are turned off
The blue status indicator light and the Korean name display on the button serve different roles. Even if the status indicator is off, the name can still be read. The image above is a generative image explaining the display principle, and in the master bedroom group, the exhaust fan's status is also reflected in the overall indicator.
02 / A little longer

Even if the lights are off,
ventilation continues a bit more.

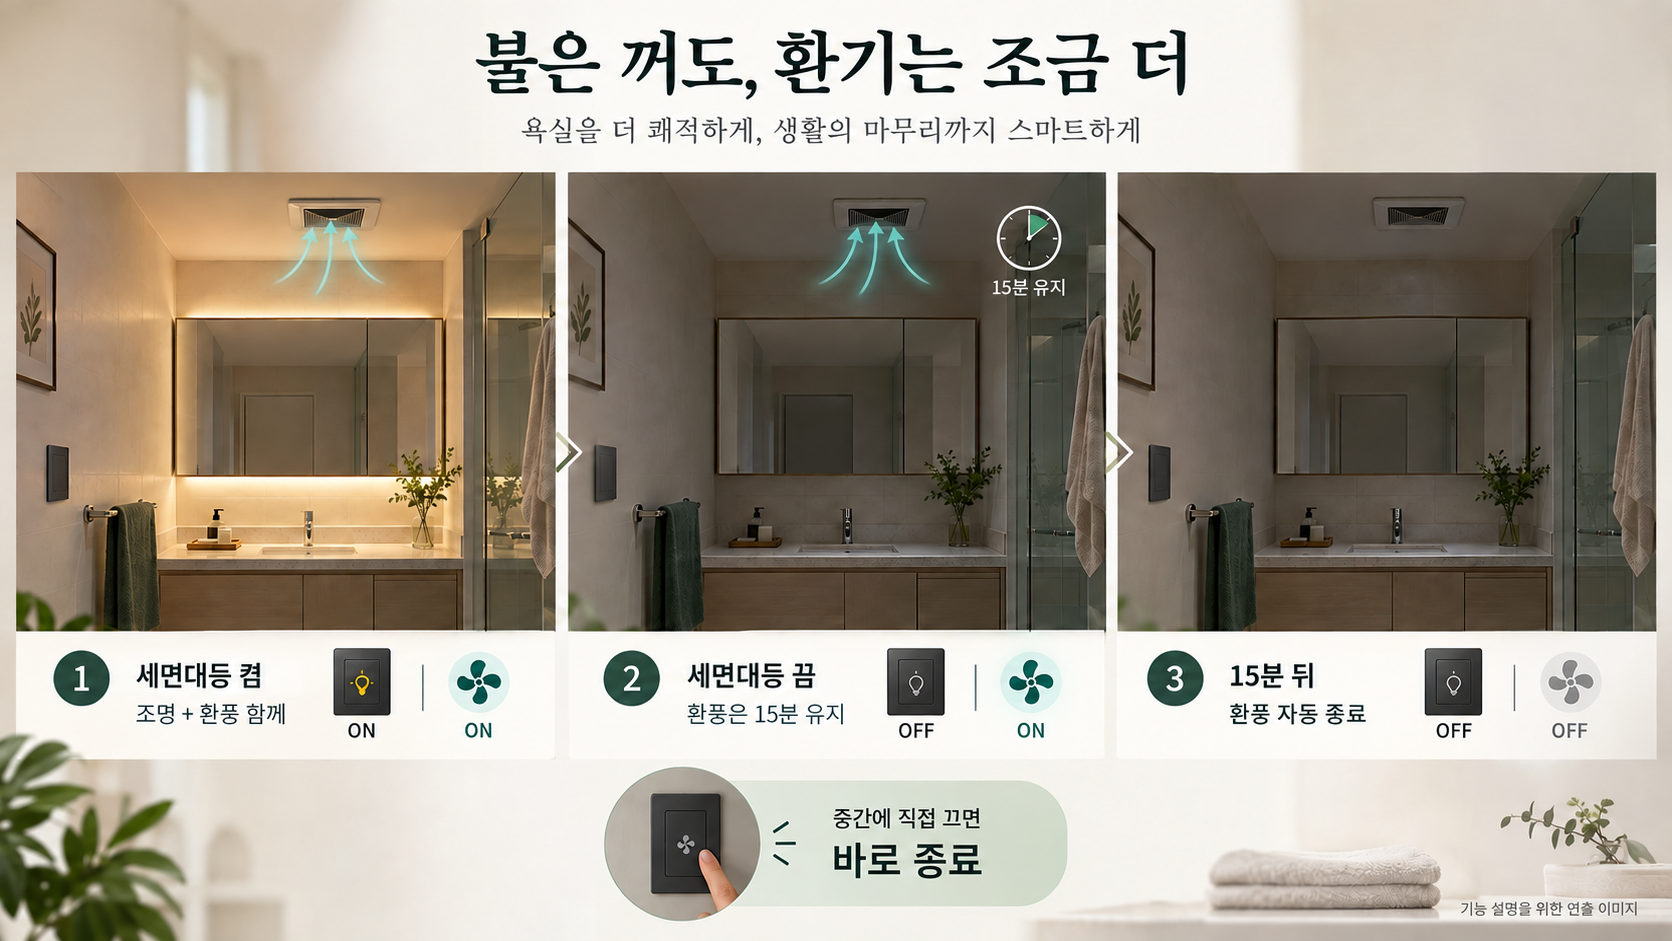
The process of turning on the vanity light and exhaust fan together, then maintaining only the exhaust for 15 minutes after turning off the lights before automatically shutting down
This is an example of the operation for the master bedroom vanity light and exhaust fan. 15 minutes is the set duration; it is not a time determined by measuring humidity.

03 · Bathroom Light and Exhaust Fan Interlocking

When you turn on the bathroom light, the exhaust fan also operates together. After turning off the light, only the exhaust continues to run for 15 minutes, and you can manually turn it off in between.

25 seconds · 3.4MB · Includes ambient sound

Open video separately

Bathroom lights and exhaust fans are often used together. So, I set it up so that turning on the vanity light also turns on the exhaust fan. However, if you turn both off when leaving, you have to reach for them again if you want more ventilation. I set the lights to turn off immediately, while the exhaust fan stops after 15 minutes.

I couldn't just add one timer and be done with it. This is because you might re-enter the bathroom or manually turn off the exhaust fan yourself. To ensure automation doesn't contradict human operation, I also defined exceptions.

If you turn the light back on,

it cancels the ongoing shutdown schedule. The exhaust continues to run, and it starts counting 15 minutes again from the next time you turn off the light.

If you manually turn off the exhaust fan,

manual operation takes priority. It immediately turns off the exhaust fan and cancels the schedule, preventing it from turning back on just because the light is on.

The master bedroom 'Turn All Off' also turns off the exhaust fan.

The master bedroom group includes the exhaust fan. Individual vanity light dimming applies a 15-minute exhaust run, but bulk dimming is treated as an explicit operation to turn off the entire group. The fact that the bulk indicator is on while only the exhaust fan is running is also an action resulting from this setting.

03 / Both ends agree

Press from both ends of the hallway,
and view the status from both sides.

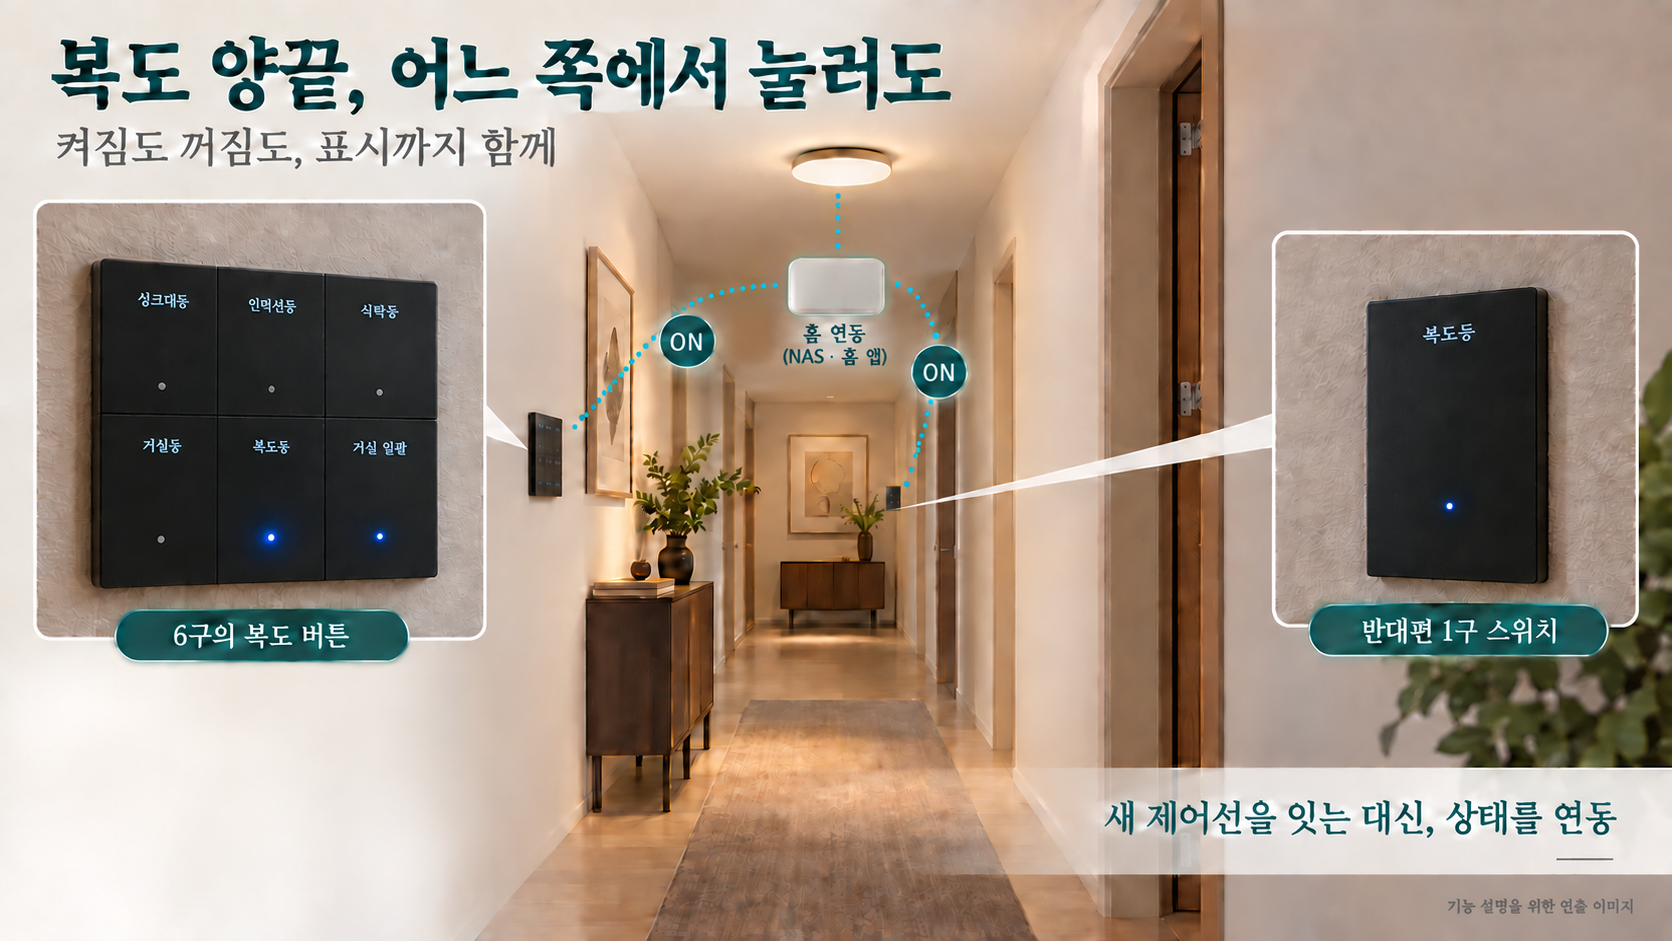
A conceptual diagram showing the corridor entrance's 6-gang switch and the corridor end's 1-gang switch sharing the same lighting status. The enlarged image on the right points to the 1-gang switch at the end of the corridor.
I linked the 6-gang switch at the hallway entrance with the 1-gang switch at the end of the hallway. The dotted line indicates command and status linkage via software. This does not mean that a new dedicated control wire was connected between the two operation points, nor does it eliminate the power and load wiring for the switches.

I assigned 'Hallway Light' to the 6-gang switch on one side, while leaving the 1-gang switch on the opposite side as is. The command sent from the 6-gang button was connected via Home app automation to control the actual hallway lighting.

Initially, I focused only on turning the lights on and off. However, I noticed a problem where the indicator light on the 6-gang side remained on even when the light was turned off from the opposite side. The fact that operation was possible did not mean that linkage was complete.

Therefore,I also created a pathto return the state of the actual hallway switch to the 6-gang button. When turned on from the opposite side, both the hallway indicator and the living room group indicator turn on together; when turned off, the hallway indicator follows suit. If all other lights in the living room group are off, the group indicator also turns off.

Now, I no longer need to remember which side was operated. Instead of running a new control wire for a long distance, I made it so that different switches share the same lighting state.
04 / More keys, clearer roles

Replaced the 4-gang position with a 6-gang.
Added functions to the increased number of buttons.

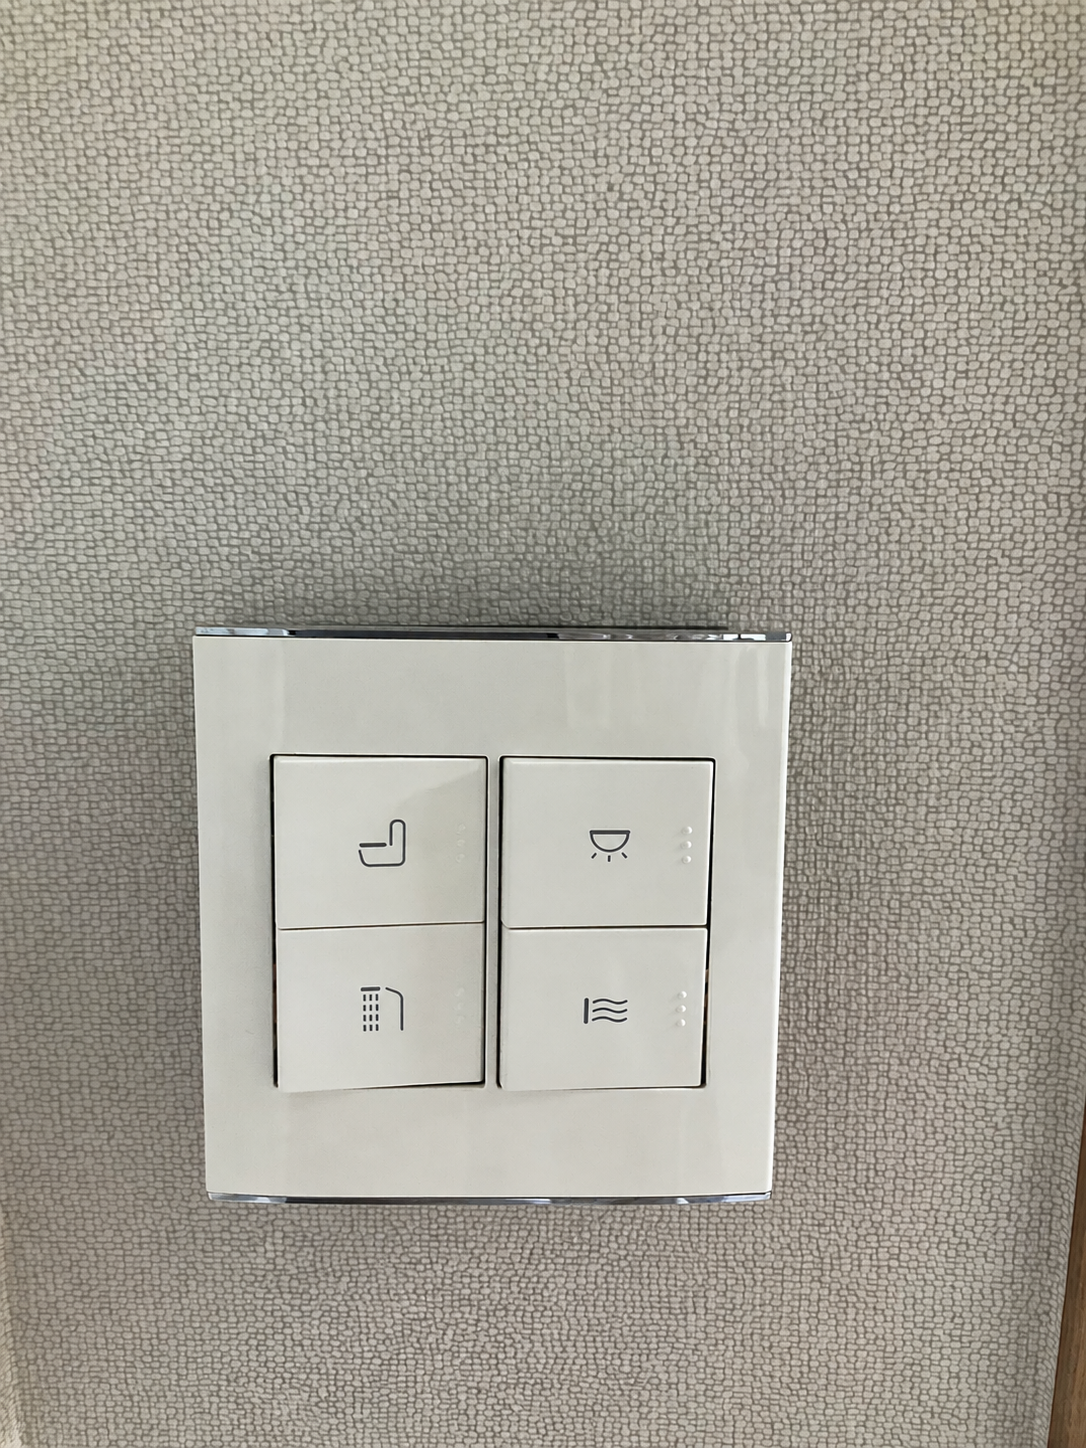
BEFOREExisting 4-gang switch
Actual photo of the existing white 4-gang mechanical switch.

Individual control via four physical buttons

AFTERKorean-labeled 6-gang switch
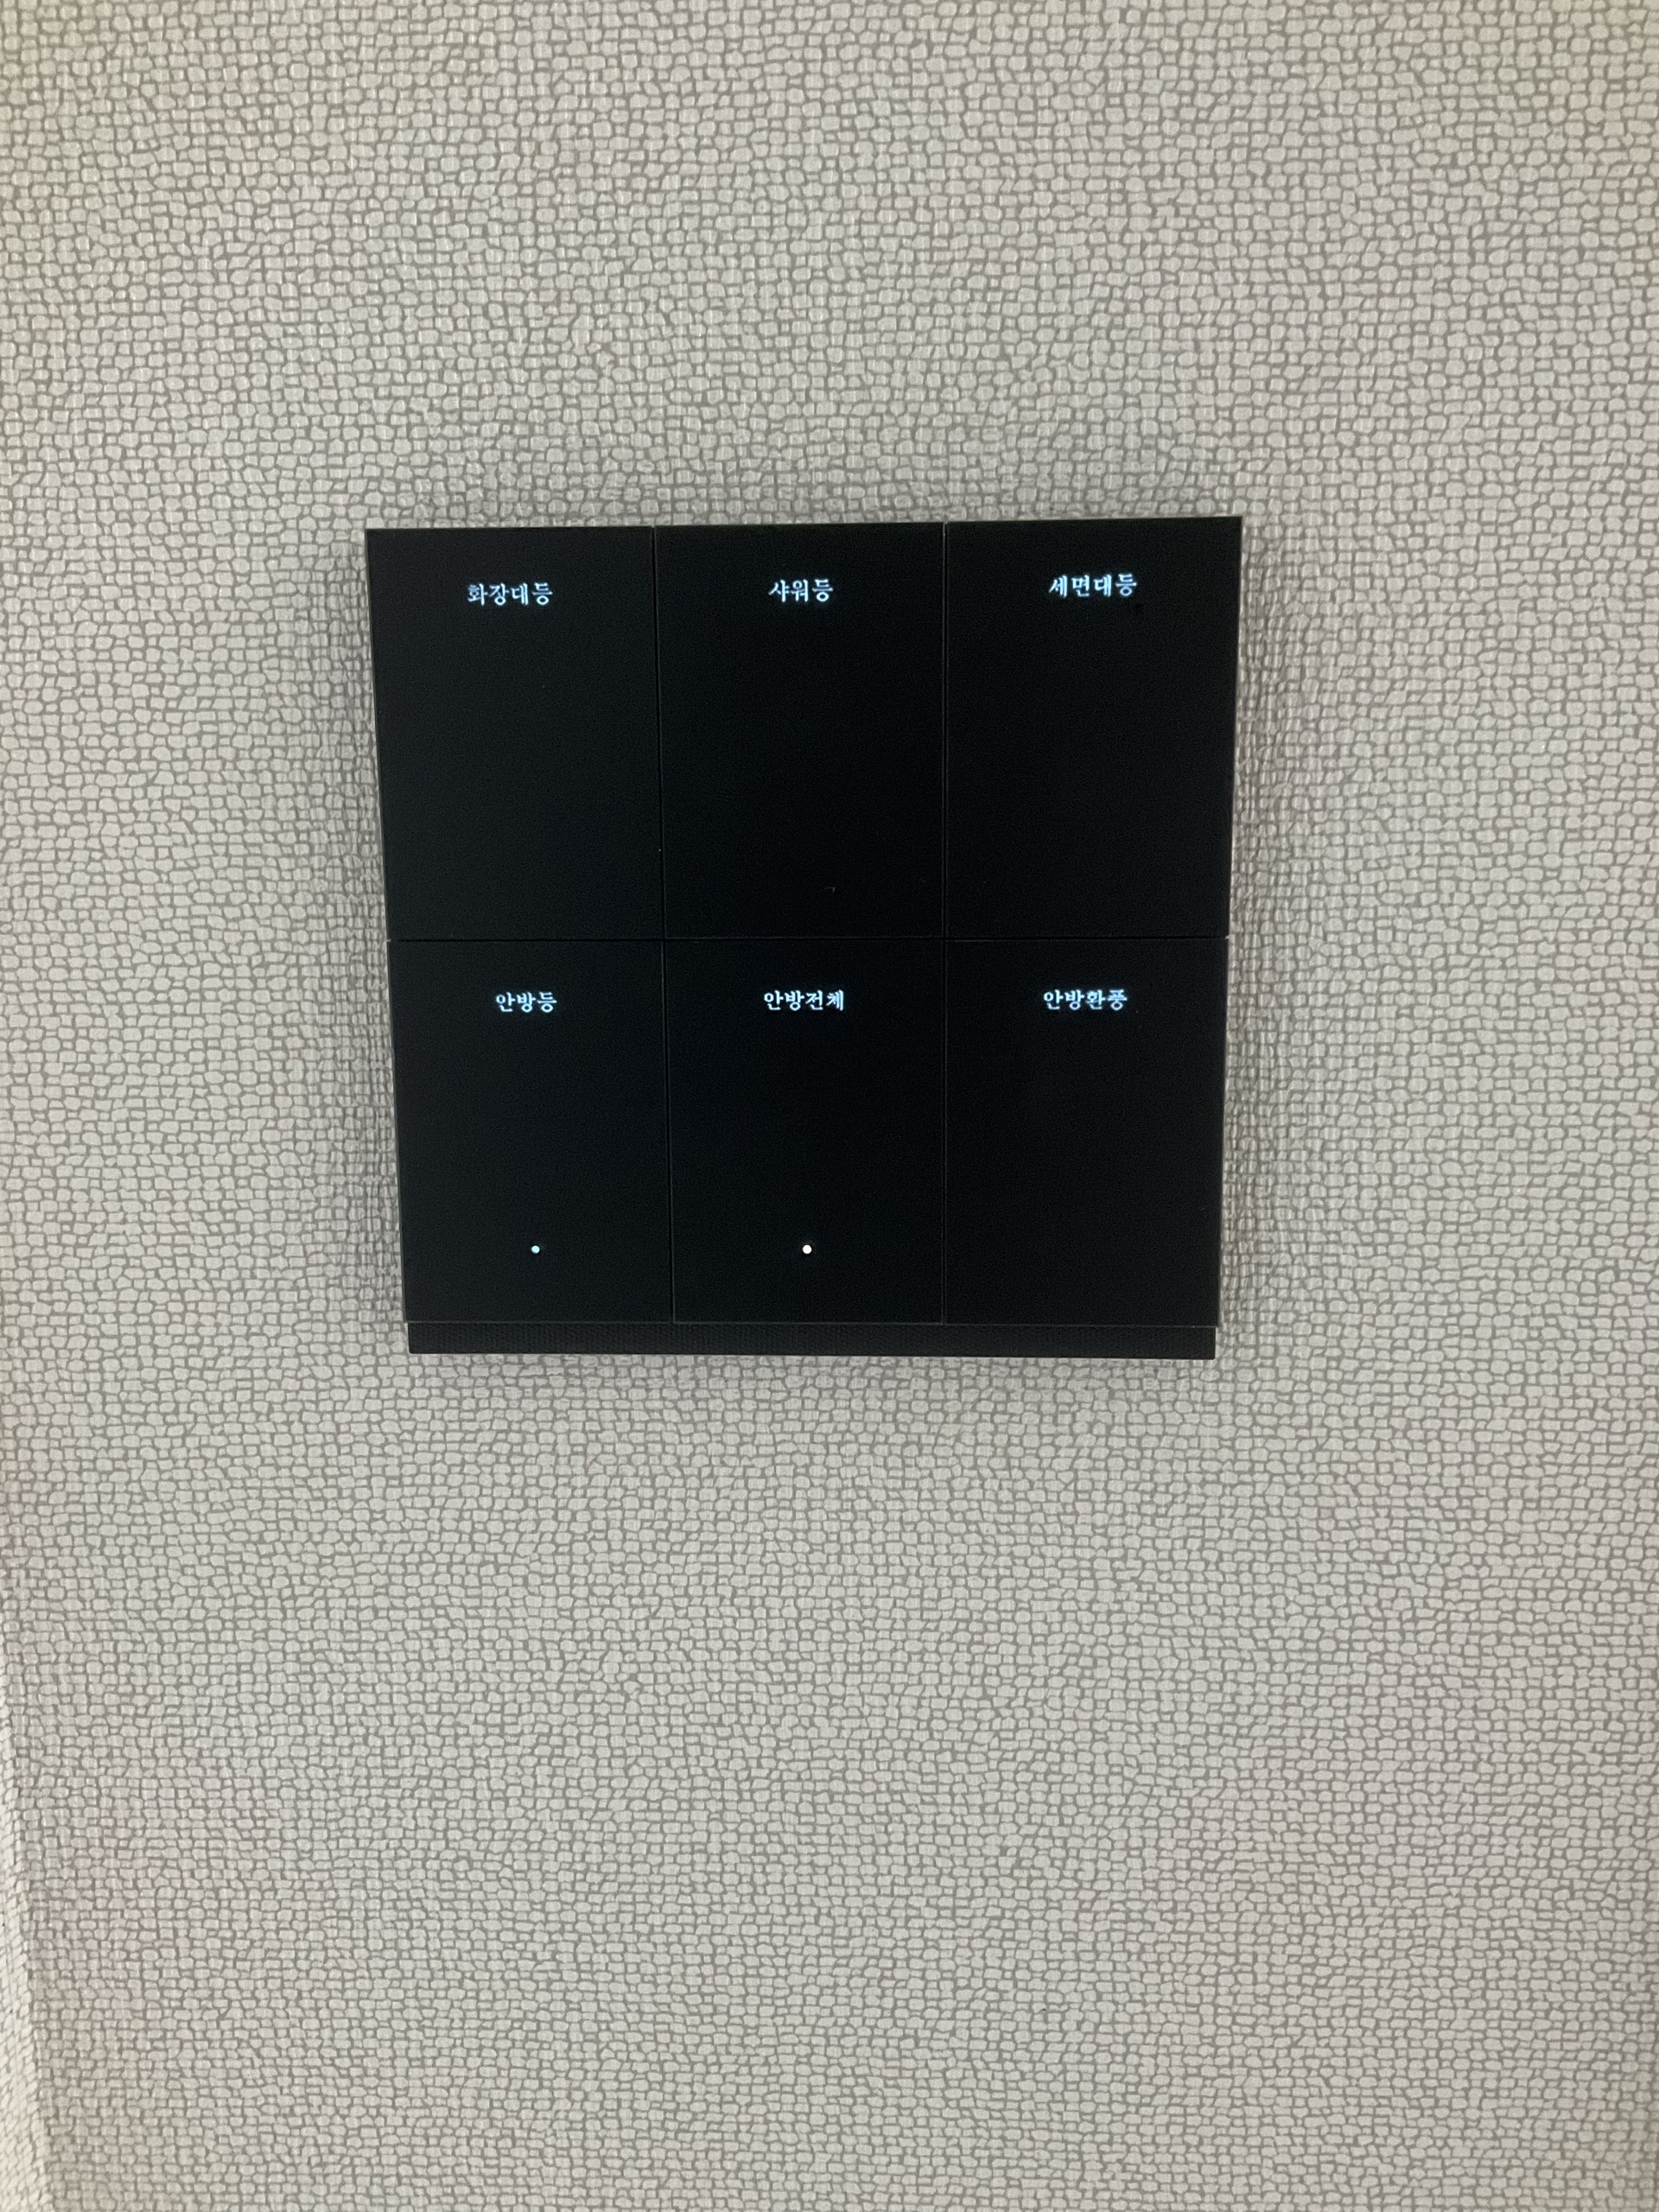
Actual black 6-gang smart switch with Korean labels for vanity light, shower light, sink light, bedroom light, entire bedroom, and bedroom ventilation.

Added functions for 'Bedroom Light' and 'Bedroom All' to the extra button

This is the actual appearance of the 6-gang smart switch that replaced the existing 4-gang mechanical switch. The two products used this time have the same front surface area and installation depth, allowing them to be installed in the existing location without additional construction such as widening the wall or changing the recessed box.

By replacing the existing 4-gang mechanical switch with a 6-gang smart switch, I was able to use two additional buttons. In the bedroom, in addition to the four direct control roles of the existing setup, I configured 'Bedroom Light' (connected via a wall pad) and 'Bedroom All' (grouping multiple devices) as program functions.

With more buttons, you might get confused about which one to press. Therefore,it was important to use Korean labels for functions like 'Vanity Light', 'Bedroom All', and 'Bedroom Ventilation'.Instead of memorizing numbers or positions, you press the button by reading its name. It has become a wall-mounted control panel that can be used without taking out your smartphone.

Bedroom · 6 functions
Function NameButton Role
Vanity LightIndividual Lighting Control
Shower LightIndividual light control
Washbasin lightStarting point for linking light control and exhaust fan
Master bedroom lightConnect existing wall pad lights via program
Master bedroom overallMaster bedroom light and exhaust fan batch control
Master bedroom exhaustIndividual exhaust fan control + delayed shutdown
Living room · 6 functions
Function nameButton role
Sink lightIndividual light control
Induction cooker lightIndividual light control
Dining table lightIndividual light control
Living room lightConnect existing wall pad living room lights
Hallway lightTwo-way linkage with the actual switch on the opposite side
Living room overallKitchen, dining table, living room, and hallway group control

In the photo above, you can see six Korean names for the bedroom switch. The table above lists functions and does not indicate terminal order. The connection structure differs between the bedroom and the living room, so '4 direct connections + 2 programs' are not applied identically to both.

Beyond the wall switch

Press on the wall, check from outside.
It moves with a single word.

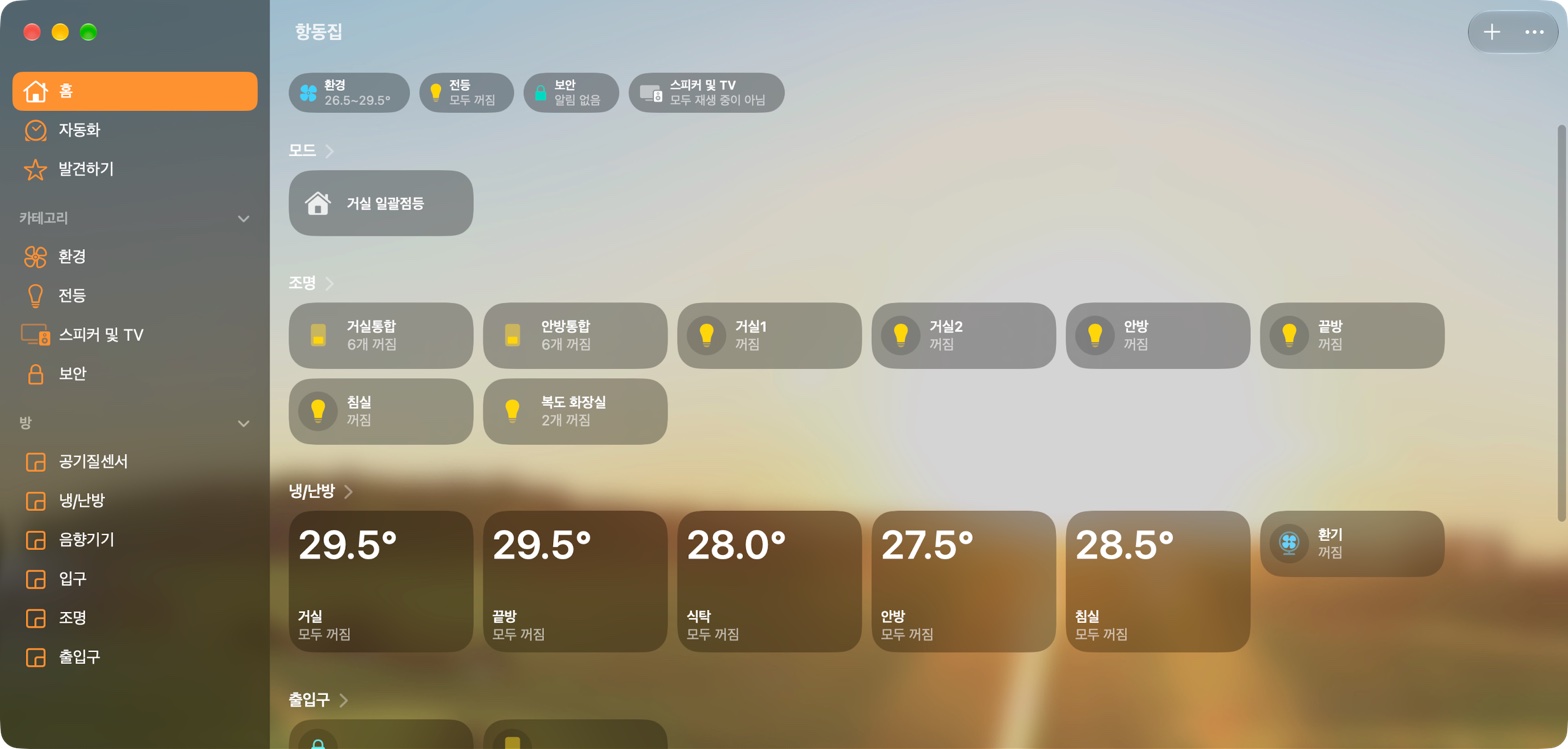
Actual Apple Home screen. The lighting area displays tiles grouping six functions each for living room integration and bedroom integration, with individual lighting, heating/cooling, and ventilation shown together.
This is the actual Apple Home screen after setting up the smart switch. The six functions for each room are gathered under 'Living Room Integration' and 'Bedroom Integration'.

The wall switch's functions are also connected to Apple Home. This structure allows you to control the same lights via the wall button and the Home app, and make voice requests to Siri. You can check and control the home's lighting without standing in front of the switch.

Check home lighting even when abroad

If your home and mobile phone are connected to the internet and the home hub and remote access are set up correctly, you can turn lights on and off using the Home app from anywhere in the world. If you remember leaving a light on after going out, there is no need to return home.

"Siri, turn on the living room light."

If you request by the name registered in the Home app, Siri will control that light. Modes grouping multiple lights can also be executed via voice.

Remote control requires a home hub such as HomePod or Apple TV and an internet connection. In this configuration, services connected to the NAS bridge must also function normally.Apple's Siri/Remote Control Guide

You can also add automations tailored to time, arrival, and departure.

This is a method of linking single-press actions to life conditions. Below are usage examples that can be added to this configuration.

Siri · Time Schedule

"Turn off the living room light in 1 hour."

You request a schedule to turn off at a specified time. You can check if the schedule was successfully registered from Siri's response.

Siri · Specific Time

"Turn on the bedroom light tomorrow at 7 AM."

You can request to turn it on at a desired time. Daily recurring schedules are set up in the Home app's time automation.

Home App · Arrival Automation

"Turn on the living room light when I enter the house."

Connect the living room lighting to the 'When People Arrive' condition in the Home app. It is set to operate based on arrival using location information.

Home App · Departure Automation

"Turn off all lights when I leave the house."

Connect the lights or modes to turn off to the 'When People Leave' condition. You can also set it to 'When the Last Person Leaves' so that lights do not turn off while family members are still present.

The support range and recognized phrases for time schedules vary depending on Siri's language and device environment. The arrival/departure examples are sentences expressing desired actions, and location permissions and Home app automation must be set up separately. This does not mean that all four examples above were set up and verified in this home.Apple's Mode/Automation Setup Guide

Made with an agent

What I described was the inconvenience in daily life,
and the agent translated it into action rules and code.

I did not provide a complete program design from the start. I explained scenarios such as 'if even one light is on, the overall indicator should be on', 'the exhaust fan should run a bit longer', and 'even if it's turned off on the opposite side, please show that it is also off here.'

The agent organized which devices each button controls and added group control and exhaust fan delay logic to the Homebridge plugin. I tested by pressing the actual wall buttons and explained parts that differed from my expectations. Through this process, we refined the actions from simple on/off operations to ones that are practical for daily use.

Describing the desired scene

Instead of device commands, I explained when, what, and how I wanted to use them.

Connecting buttons and states

I separated devices directly connected from those controlled via the bridge, and implemented action rules in code.

Testing and refining again

I alternated operations between the wall button and the Home app to check for display errors, delayed status updates, and manual interruptions.

What was difficult was not so much creating an additional button,but ensuring that commands and states do not get tangledwith each other. For example, if a status sent to align the indicator light is interpreted as input from a new button, unwanted batch actions may occur again. I also had to handle issues where late-arriving previous states would revert recently changed indicators.

I worked with the agent to fix and test this part. The completed switch does not request AI judgment every time a button is pressed. The agent assists in the creation process, while daily operations execute predefined rules.

Under the switch

On the wall, there is a button,
Rules for NAS operation.

To implement a similar feature, it is advisable to first distinguish the roles of physical devices and software. This case has been connected with the following configuration.

The role of each element in this configuration
CategoryComponentRole
Physical DeviceMANHOT MH03-6W 6-Gang Wi-Fi SwitchHandles physical input from wall presses and control of individually connected devices. Based on the labeling of the actual product used; functionality is not guaranteed for products with the same appearance.
Physical DeviceExisting Corridor 1-Gang SwitchControls the actual corridor lighting and serves as an operation point on the opposite side.
Connection Basis2.4GHz Wi-Fi · Smart Life/TuyaTransmits commands and status for the smart switch.
Execution EnvironmentNAS HomebridgeConnects the switch to Apple Home and executes custom operational rules.
Modified SoftwareSwitch processing section of the Tuya Linkage PluginImplemented exposure of 6 channels, function names, group status, physical display synchronization, and delayed exhaust fan operation.
Existing Facility ConnectionIMAZU RS485 BridgeControls wall-mounted panel lights that are not directly wired to the smart switch.
Automation ConnectionApple HomeResponsible for command and status linkage between Home app operations and the corridor switch.
① 'All' is not a separate device but calculated from group status

If any channel included in the group is on, the group is displayed as on. Pressing the master button sends commands to all members in the opposite state of the current status. Since the bedroom group includes the exhaust fan, if the lights are off but the fan is running, the group is considered on.

Group Status = Is any member on?

Master Button Input:
  Current Group On → Turn all members Off
  Current Group Off → Turn all members On

Individual Device Status Change:
  Recalculate group status
  Update Home app display and physical master button display

This code is pseudocode explaining the principle. Actual implementation adds processing during command execution, sequential transmission, and criteria for reflecting late-arriving status.

② Distinguish between signals that synchronize status and user input presses.

When a status sent to update batch indicators returns and is re-executed as a batch control command, it can cause a loop. We distinguish recent commands, display updates, and statuses returned from devices to prevent unnecessary re-execution.

Actual devices and external services have delays in transmitting status. Therefore, we correct so that previous statuses arriving immediately after reflecting new status on the screen do not revert the display, and handle checking subsequent statuses again. This does not eliminate communication latency itself.

③ Ventilation scheduling considers re-entry, manual stop, and restart.
SituationProcessing
Turn on washbasin lightTurn on ventilation and cancel existing end scheduling.
Turn off washbasin lightIf the ventilation is operating and not in a manual stop state, schedule shutdown after 15 minutes.
Turn on again while waitingCancel end scheduling and switch to a new usage cycle.
Directly turn off the ventilatorPrioritize manual operation and cancel scheduling.
Turn off entire master bedroomAlso end ventilation included in the group and cancel scheduling.
Homebridge restartIf saved end time and device status meet conditions, restore remaining schedules.

Schedule restoration is a feature implemented in the program and verified through mock testing. It does not mean continuous operation has been verified under all field conditions such as power outages or communication failures.

④ To apply this to my home, first organize it in this order
  1. Start by writing the role of each button.Divide into buttons that control directly connected devices, buttons that call other systems, and buttons that group multiple devices.
  2. Check device commands and status.Verify not only if it can be turned on/off but also if the current status can be read when operated from elsewhere.
  3. Write frequently used situations as rules.Determine the scope of joint movement, end delay time, and priority when a person manually operates.
  4. Attach features one by one and test pressing from both sides.Check wall button → Home app and Home app → wall display. If there are two operation points like in a hallway, repeat turning on/off at each point.
  5. Also verify recovery during operation.Observe and improve how display and reservation behave during service restarts and communication delays.

Actual wiring of the power supply and load must be verified according to the product and existing facility conditions. This material explains functional design and software integration and does not provide electrical wiring procedures.

The connected foundation

Three apps and an apartment wall pad
Thanks to having them all gathered in Apple Home.

Before this switch installation, I first connected the scattered control methods within the house. Lighting, heating, and ventilation required the Wall Pad app; Samsung air conditioners needed SmartThings; and the door lock required a separate app. Even though it was the same house, it was inconvenient that different apps had to be used depending on what was being turned on or off.

So, instead of buying all new devices,I collected signals from existing facilities in a NAS and gathered them into Apple Home via Homebridge.Finding and attaching different connection methods for each device was the key.

A brief summary of existing HomeKit integration work
Existing devicesConnection methodChanged usage method
Apartment IMAU Wall PadCommunication was collected using a USB-RS485 adapter. By operating lighting or heating one by one and comparing the changing packets, commands and statuses were interpreted.Existing lighting, heating, and ventilation are controlled in Apple Home, and actual statuses are received and displayed again.
Old Samsung Air ConditionerSmartThings products that do not support Matter were connected to Homebridge using the Samsung Developer API.Cooling in the same room and wall pad heating are selected from a single tile. This path uses the internet and the SmartThings cloud.
Unit Entrance Door Lock · Common EntranceThe LG Smart Lock at the unit entrance was connected to Home. For the common entrance, separate control lines and video lines from the kitchen monitor were branched and delivered to the NAS.Entrance control and entrance video, which were scattered across apps, are now checked together in Apple Home.

In particular, the common entrance could not be resolved solely by the wall pad's lighting circuit. The fact that the kitchen monitor also receives entrance calls and opens the doorwas noted. Separate control signals coming through that monitor were utilized, and video was received via baluns and encoders into the NAS, connecting to Apple Home's camera and doorbell notifications.

With this connected foundation, this 6-gang switch was added. The added buttons move wall pad lighting via the NAS and control multiple devices in the room at once. In the process of gathering existing facilities into Home, it transitioned into a task of aligning wall switch operations with our daily lives.

See details on component configuration, packet collection, and entrance video connection in existing cases →

What is working

Verified operations and
Aspects to monitor further.

Confirmed in the operation log

  • Simultaneous on/off for the living room and master bedroom; batch display based on individual status
  • Linkage between dual-side corridor control and the 6-gang indicator light/living room batch display
  • Turning on the exhaust fan when the vanity light is turned on
  • Passed mock tests including delayed shutdown, manual cancellation, and scheduled restoration

Separation of settings and verification

The exhaust fan maintenance time was set to 15 minutes. The delayed shutdown logic was verified through shortened-time tests; however, field verification records waiting for the full 15-minute duration were not found separately.

Home app tests were confirmed after the last status correction, but further review is needed through actual usage to verify all physical button combinations and long-term stability.

In the future, I want to refine group configurations for frequently used scenarios such as bedtime and leaving home. The next steps include adding sensors to refine conditions or reduce unnecessary operation time. However, sensor-based exhaust or power savings have not been verified in this case.

One button
encapsulates 'our home's way'.

Rather than increasing the number of switches to six, it was better that we could directly decide how to use that button. The process of turning requirements arising in daily life into actual operations together with an agent. This time, the result is mounted on the wall.

Related case: The story of gathering different apps and devices into Apple Home

문서 제출 전 체크 · 무료 체험UPMI 익명 방문 통계 안내·중지